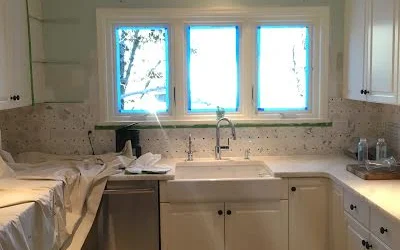
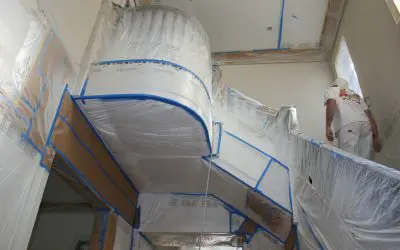
Impress Your Holiday Guests with a New Interior Paint Job

Impress Your Holiday Guests with a New Interior Paint Job

Red Accent Wall Living Room Painting

‘Tis the season to be jolly and time to pull out Christmas lights, ornaments, garland, mistletoe, and your inflatable yard Santa. Since the arrival of the holidays, many people are searching for interior decorating ideas that will bring cheer to their home. There are several holiday decorating suggestions available but why not celebrate this season with a new interior paint job?

A lot of people strive to give their homes that special holiday feeling and adding a little color to your walls is a perfect way of doing so. A new interior paint job can refresh and rejuvenate a home but if you add colors that are festive and bright, it can help lift spirits of those who enter your home.

Choosing Durable, Festive Colors

When a room that needs to repainted and will eventually be full of guests, higher level sheen paints are ideal. These paints are easier to keep clean and have a higher resistance to stains. Variations of green and red are the obvious go-to choices for walls. These colors work beautifully with interior walls year-round.

Green – Green is associated with vitality and wealth. This color is usually intended to foster productivity and creativity. Studies have proven green to be one the most relaxing and calming colors. It for sure will help with the hectic holidays. Green is ideal to be used in both kitchens and dining rooms.

Red There is a wide variety of red hues to choose from. Red is a warm color that will give your home a cozy setting. Oddly, it can also act as an appetite enhancer, which makes it a great choice for dining rooms, where the holiday festivities often take place.

These aren’t your only hue options for pre-holiday painting. Interior paints come in various colors and sheens. Be sure to use a color that you will be satisfied with once it’s time to put the decorations back in storage.

Accent Walls

If you feel that you are short on time to have an entire room repainted, we recommended adding one or two holiday color accent walls. Accent walls can add a chic feel and the appearance of the entire room will be completely different. If you later fall in love with the choice of color, other walls can be painted later.

The holidays aren’t only about celebrations but also the décor. With the right interior paint job, your holiday décor will pop and will be rewarding. Not only will the Christmas lights outside impress your guests, but the new interior look will make your gathering even more special. Gift a loved one with a home renovation that will not only renew and rejuvenate a home but it will also create a cheerful, positive energy that radiates through your home.

If you need help sprucing up your interior paint for the holidays, give the professional painters at Imhoff Painting in Denver, CO a call @ (303) 650-0933.


Exterior House Painting – How You Can Know What You’re Buying Beforehand

I have to admit, sometimes a cheap paint job looks pretty good when it’s done, in fact, without knowing what was done a bad paint job can look a lot like a good paint job. Sometimes even with close scrutiny it is difficult to determine. How can this be?

The first thing to remember is that there is a psychological transition occurring: it looked lousy, now it has been painted, ergo, it looks great – this is huge; you may be delighted because it looks so much better, but in short time you will see evidence of things not done well.

Paint seldom falls off, and never fades, overnight. Improper caulking and other surface prep shortcuts seldom show themselves right away. It takes time, so the job looks fine but then – then you notice a caulking seam has buckled, or there’s fading, peeling, etc., and it’s only been 6 months, or a year or two, but it’s beginning to look like you need to paint again.

That is, if you were looking but you’re not because its spring, and your house was painted last spring or summer or fall or just the ___ before so it’s fine, we don’t even have to think about it – so let’s go for a bike ride…

So what is the trick to knowing – before signing the contract – what you’re getting? You’re contract may specify: “prep, prime and 2 coats” but that isn’t good enough.

If you were baking bread and your recipe specified: “combine all ingredients and bake in a hot oven” how good would your bread be? It might be great but if you weren’t doing it by repetitive-memory what are the odds of that?

The Top 5 Short Cuts to Know and Avoid (just paint mechanics, not insurance, financial or security related – these 3 deserve special attention)

1. Prep: scraping loose paint, removing buckled caulking, sanding where necessary, priming prepped areas, re-applying caulking, priming again, then washing the house. There’s a lot that can be avoided here, days’ worth of work in many cases. Skipping some or all of this doesn’t mean the finished paint job will look crappy right away, but crappy it will look.

2. Primer: using the right primer for the situation, not just the cheapest can that has “Primer” on the label. There are dozens of primer types and they’re specific to the need and the surface. Some primers cost $100/gallon and others $10, and just like everything else, you get what you pay for. Why use a cheap primer and expensive paint? Will the expensive paint hold the primer to the surface? For a while maybe, but the first good reason the cheap primer gets it will let go of the surface it was holding on to – like a short freeze/thaw cycle, or a little surface moisture.

3. Good Paint, and the Right Amount: paint manufacturers provide recommended spread rates for a gallon on paint, usually 400 sq. /ft. This is applying the paint at the minimal recommended mil-thickness, not optimal. Optimal is probably closer to 350. Your house has a specific amount of surface area to be painted, your contract should include that number, multiplied times 2 – if you’re buying 2 coats. If your contractor says he’s putting on 10 gallons with a brush so it’s thicker, he’s either a liar or a fool and you should find another contractor or buy him a calculator so he can show you how that math works.

4. Two Separate Coats: Spray then back roll is not 2 coats! – If I had a grain of sand for every time that lie has been sold, I’d be an island prince. Or this one: “one good coat with a brush is the same as 2 with a sprayer”, right. Try that next time you bake; one cup of flour from a glass measuring cup is worth 2 from a plastic one – that sounds silly to everybody, whether you’ve ever baked or not.

5. Method of application: sometimes a sprayer is best tool, sometimes rollers, sometimes brushes, sometimes pads, often times all are used – it all depends on what material is being applied to what surface, but always it should be specified. A sprayer has different tip sizes that allow either more, or less paint to be applied. Brushes and rollers can apply the same load (the amount of paint that can be held by the tool) to either a larger, or a smaller space – it is all about the spread rate in the case of any application tool.

In Summary Your Contract Needs to Specify Process, Prep Levels, Cleaning, Type and Number of Gallons of Paint, application method. Warranty coverage and period need to be specified, but can and often are covered by a different document.

Now, you know what to look for.

Next, when interviewing contractors to paint your house, ask questions about the 5 items listed above.
Make notes and compare them to the contract you’re offered, if specifics aren’t listed in the contract, they will not be done!
If you want something done and it’s not specifically listed, the only way to make sure that item gets done is to be there the whole time and watch it being done.

Just Because It’s on your Contract doesn’t mean it will be done.

Because of the nature of the painting trade, there are many players who are transient; either geographically, or vocationally. Asking an unprofessional tradesman whether he’s going to do X and then trusting him to do so is foolish, and is the reason your contract needs to be specific.

Transient actors aren’t thinking about the future, i.e.: the next time they’re going to be painting your house.
No, they have a different future in their cartoon bubble: “…finish this house today and we can start Mrs. Flotsam’s tomorrow and get paid for 2 jobs by Friday – That’s as long term as the strategic thinking goes in most cases.

Above and Beyond the Contract is Trust:

Simple trust: do I trust this person that what the items and actions they have listed on my contract will be adhered to? This is a really good question to ask yourself. This is a feeling question, so trust yourself here.

But Verify:

Check-in frequently as the project progresses. Don’t be passive about this, go outside and look, make notes and go over your questions with the contractor the following morning.

Don’t be afraid to shepherd your project a little. If, in doing so, you find some problem and begin to wonder if you’ve made the right choice, listen to that fear and bring it up, do what you must to get it straightened out, stopping the job if necessary.

That’s a wrap:

So Hire a good contractor to perform a specific contract and stay on top of the process and you will be happy with your purchase years from now. It really is simple, and remember that the pain of poor quality lasts longer than the joy of cheap price.

Exterior House Painting – How You Can Know What You’re Buying Beforehand

The Top 5 Most Common Problems With Painting Projects

It’s Just Painting; What Could Go Wrong?

Ok, time to talk about the other elephant in the room (the first one being how much does a good paint job cost?), this one is: what can go wrong with paint jobs?

Well, in my cartoon bubble, a paint job is the entire experience: workers, finished project, communication with the workers, and the office, project management, estimate accuracy vs actual/final cost, billing, etc.

This is more than just the finished job, it’s the whole experience that determines if you’re going to invite a company back or not.

And the short answer to the question is: quite a lot can go wrong.

A better question might be: how bad was it?

That question is a bit of a hat-tip toward the menacing reminder of what could be, for most consumers over 30, a memory an experience contracting a tradesman or service provider wherein nothing went as expected, and after which the entire white-knuckle ride was best forgotten.
Everyone in that demo has a tale to tell – a war story of sorts – and we often do tell, to amuse and admonish, and to remind our now-self of what our then-self said: as the events were still unfolding: “I’ll never do this again!”

Painting is a very intrusive process, it’s disruptive to living, privacy, spaces, and schedules.

Painters are in and around the house, inside bedrooms & bathrooms, closets, kitchens, everywhere! Paint work is also intrinsically messy: wet stuff from cans spread out and allowed to dry: oh the possibilities!

Painters should be tidy, conscientious, open, honest, diligent, trustworthy, communicative, responsive, sober, neat, hygienic, organized, efficient, responsible and mature.
Not that any other trade can or should possess fewer of the above characteristics, but many can coast with the right 2 or 3 of them. Painters cannot…

A good painter should be like a butler or concierge; skilled, friendly but not familiar, a consummate professional.

The trouble is, as noted in previous writings, everyone has painted, everyone knows a painter, everyone has a collection of paint tools and almost everyone is related to one.
Painters are like home cooks – millions perform the act but like home cooks, the quality and variety of experience delivered by painters is just as wide.

The other basic truth that undergirds painting as a trade is the fact that the practice isn’t regulated; there is largely no body of codes that regulate process and finished work, unlike nearly all other trades – in painting, it’s up to the painter, and anyone can call themselves one – try that with electricians or plumbers.

This is not to say there are no standards, there are: PDCA Industry Standards are becoming more universally recognized and utilized to set the bar, but they’ve yet to trickle down, and the ubiquitous nature of the trade itself places it comfortably within the realm of an activity (like cooking). And aside from lead abatement and safety aspects, painting will never be regulated like other trade professions.

Now that the table is set, I have a confession: I have personally experienced all of the following 5 scenarios, not only from a customer’s perspective, but from the contractor’s – the perpetrator – as well; I’d love to be able to say here that nothing has ever gone wrong on one of our projects in 20 years – but that would be unbelievable, and untrue.
Some of these top 5 are repeat offenders, others we’ve corrected from the first exposure. This piece is meant more in the spirit of a serial admonition, a cautionary tale – than an exercise in finger pointing.

The top 5 things that go wrong on paint & stain/finish jobs:

1. Communication – it’s not rocket science, just a painting project. The painters show up, install the paint, what could go wrong? This could be #1 if we throw in all the things contained in #1 that would be covered by effective, thorough communication. So much ground is covered with in this topic that examples are superfluous; suffice it to say that if you haven’t covered it in a conversation, or better yet, in written communication (proposal, contract, text, letters, emails) it is safe to say it hasn’t been covered, only assumed by you, the finisher, both. 2 or more sets of assumptions are often in play: those of the homeowner, the painting company owner, the project manager and/or the workers.

2. Oversight: “It turned out fine, but it was like pulling teeth and I felt like I was the job supervisor.” In the sales/estimating process for a painting job there are 2 parties: the seller and the buyer; the seller has things in his/her cartoon bubble, the buyer things in his/hers. They’re both talking about the same project, but they’re seeing different things, and from a different perspective. The buyer sees the job completed from the perspective that is not unlike a tidy retail transaction: predictable, smooth and trouble-free. The seller sees something different: an easy-going customer whose expectations are low, and a project where everything goes exactly as planned. Then the job begins…

3. Schedule and timeline: Contractors are notorious for over-populating their schedules and juggling multiple jobs at the same time, spreading themselves thin so that every customer gets a little progress and nobody is completely neglected. Imagine a mechanic changing tires on 3 cars at once, but one tire on each car then moving to the 2nd tire, on each car – crazy, but it happens so often in the trades it has become prosaic. The fear of losing a job, fear of disappointing, desire to please everyone, feast/famine cycle, any or a little of each may be in play in the mind of the contractor. The effect of this on the consumer has, over time, conditioned people to lower expectations to the point where they’re just happy when someone finally shows up to work! It’s a little bit like the soft prejudice of low expectations; and projections for shortages of skilled tradesmen will only exacerbate this problem. Youtube has replaced traditional trade schools, and anybody can get on Youtube!

4. “I thought that was included” Ouch! This may not be as common, but it is more disappointing; I hate to beat up mechanics again but who hasn’t had that experience? Your new brakes are $1500 not $400 like you were quoted. Back to #1, it should be communicated in the scope of work- or work order, contract, emails, even a cocktail napkin is better than a remembered conversation, and the subsequent he said she said that inevitably results from murky agreements full of flexible language, or handshakes deals.

5. Quality of Finished Work: not what was expected. Or, as they say in the trade: good from far, far from good. Unless you’ve seen their work somewhere else or hired them before, it is really hard to know what you’re going to get. “Looks great to me” is never something you want to hear from your contractor. Getting it right once it’s not right may not even be on the menu; what if it’s the best they can do? In the cooking analogy, everyone knows someone who make fabulous _____ (insert your favorite), and someone who couldn’t make it good if life itself depended on it. In that case it’s time to move on and find someone else whose capabilities exceed the first one.

I promise This Top 5 List will never change; it’s been the same in the 20 years I’ve been around. It can’t change until some technological leap makes wet stuff in cans archaic – I’m not holding my breath.

Trim Painting Short Cuts – Why you Should Avoid Them

Trim Painting Short Cuts – Why you Should Avoid Them

Our take on trim painting, in a nutshell: traditional. Great prep, very clean, use the best tools and materials. Anybody can do this, most of us have already so what’s the big deal? Shortcuts, that’s the big deal. Seems like there are shortcuts to everything these days and painting is no exception – why should it be? Why can’t we rely on a few short cuts and still have perfect painted trim? What could go wrong, right? Much could, is the short answer; let’s unpack the longer answer by looking at a few trim painting shortcuts and why you should consider skipping the skips.

Like most other shortcuts (all, maybe?) there are tradeoffs. The first can be found in the prep stage: clean, dry and dull; that’s the trinity in the realm of trim preparation.The first of these is clean, and the first short cut: use a good primer and you don’t have to clean. Reality; skipping the clean step can cause problems down the road, short term and long term. In the short term, your primer or paint may not stick on areas that are not clean, which could result in you having to stop priming/painting and start to clean – a mess and an exercise in frustration. Long term, your new trim paint may look sound, but paint over dirt doesn’t adhere, and the next time you tape up holiday or birthday decorations your gentle Scotch tape can pull off the paint. Bottom line, make sure it’s clean by wiping down surfaces with mild solution, or for heavy soiled areas such as grease build up, or smoke damage, use a TSP substitute -and scrub it – then wipe with clean water/sponges, being careful to not soak the trim or your flooring, damp is good enough, its not like washing the sedan.

Next step, surface prep: the sanding. Short cut: use a good primer and you don’t have to sand. Or, use liquid sander (chemical gloss remover) to dull the surface. Don’t do this short cut for the same reason you don’t want to skip the cleaning step. But there’ another reason to not skip this step; sanding makes the surface smoother, yielding a nicer finish. So, give it a good scuff – sand it with paper, sponges or steel wool, then vacuum the dust, and finally give it a wipe with a rag lightly moistened with thinner or water – to pick up the smallest dust particles, you may not see them, but you will feel them on the surface after your paint dries.

Magic Number3: dry. Don’t prime right away, let your cleaning & prep dry overnight. Same thing with primer, if the drying time is overnight, let it dry overnight. Rushing the finishing steps by applying a coat of paint after your primer is dry to the touch is risky- if not fully dry it will hamper the drying of your top coats, may cause adhesion problems, possibly sheen irregularities.

Priming: this may or may not be necessary; bare wood, heavy prep such as putty, fill, caulk, staining, etc. – all good uses for primer. But use the right one, ask the pro desk at Sherwin Williams or Benjamin Moore, and don’t use the paint/primer in 1 can shortcut – it is a compromise, despite what the slick commercials suggest.

Prep now done, its time to paint; the biggest shortcut to avoid here is probably using the wrong tool to apply the product. If brush lines are visible in your painted trim and doors, and you want to save time by using a roller, stop! Put down the roller and back away from the door. Rolling trim is fast, but achieving a smooth, velvety finish is very difficult with a roller – even in the hands of a seasoned pro. Only if your trim has been previously rolled, and you’re ok with how it looks, should you consider rolling.

That’s a wrap! Mostly. There are more shortcuts, of course, but we’ve laid to rest the most egregious. In my cartoon bubble, we can only pick from what’s on the menu- we can’t have a high performance anything without compromising something. And, it’s ok to compromise, but it should be done only with a good understanding of what the trade-offs are.

How To Get Smooth and Perfect Results in Interior Trim Painting

How To Get Smooth and Perfect Results in Interior Trim Painting

Painting interior trim is no different than painting any other wood or millwork surface in your house. You need to start by sanding the trim until it is smooth (if your trim is MDF, it will already be smooth, but it’s still a good idea to rough it up a little to provide profile for the primer to adhere), vacuum thoroughly with a brush extension, then apply a good quality, leveling primer.

Once the primer has dried overnight, it should be sanded again – this will remove grain fibers that were raised by the primer. Note: oil primer (alkyd) works best for 3 reasons: 1) it dries hard so it sands easy – no rubbery latex to gum up sandpaper; 2) it blocks tannin stains from leeching into your finish coats; 3) it levels nicely. After thorough sanding, clean it by vacuuming, then wipe it down with a lint-free cloth moistened with clean water or clean solvent.

Once you are done with preparing the primed surface, you can apply the first coat of paint. If you need or wish to apply a second coat, you should allow the first coat to dry properly (according to manufacturer’s recommendations) then check it by rubbing over the surfaces gently with clean hands, if the surface feels gritty or rough in places, then sand those areas again but with a finer grit sandpaper than what was used in your pre-prime sanding, then vacuum and wipe clean again with a clean lint free towel – to remove dust, finally apply the second coat of paint.

Note: if you’re installing a paint that dramatically different in color, you may need a third coat – do not try to achieve coverage by applying a heavy coat – this will cause problems like sagging, curtains, alligatoring, and an unsightly finish.

Choosing the Right Paint and Paint Brush for Trim:

Historically, alkyd based (oil, or solvent soluble) paints were mainly used in trim painting because of their high quality finish, leveling, adhesion, and for their ability to stand up against abuse – plus, that all that was on the menu. Later, with the introduction of latex and acrylic based (water-soluble) paints consumers now have a choice. These paints are popular because of their ease of use, easy clean up, and minimal environmental impact.

They have drawbacks too (as with most things, there is a trade-off); primarily, acrylic paints don’t offer the same look and feel as oil paints – they typically don’t level as well, or feel as smooth when dried & fully cured, and they don’t dry as hard as oils. New, hybrid materials, are now available; oil-modified acrylics, they offer the leveling characteristics of oil, with the ease of use found in acrylics – however, they can be tricky to use. No matter what type of paint you choose, practice on a piece of scrap if you can, if not, begin painting in a closet or some other less visible area, work your way to the more prominent, visible areas.

Curing:

Although acrylic paint dries faster than oil, oil paint actually cures (fully hardens) faster than water solubles. This is important if your trim project includes shelves, on which you want to place objects; it is very important to allow your paint finish to fully harden (cure) before placing objects on it.

Acrylics can take up to one month – and sometimes more, depending on where you live, and how thick your paint film is – oils typically cure in about 7-10 days. You can test the cure level by subjecting your new finish to the fingernail test: find an obscure place and gently press the nail of your thumb perpendicularly into the paint, if you see an impression, it may not be fully cured. You can place objects on your new paint anytime you wish, but be warned that they may leave impressions, or even adhere to the film if you’re premature.

Always choose high-quality paint brushes; and buy the brush that is most suitable to the size of molding. Choose a 2 ½ inch tapered sash brush for small trim, and a 3 ½ inch brush for wider trim, flat or block brushes for doors & paneling. If you plan to install new trim, you can prime and paint the trim boards before installing.

Just remember, you’ll need to caulk and putty your trim after you install it, then you can either touch up the putty and caulk, or apply a final coat. If you’re having difficulty, call your trim painting professional in the highlands area for advice.