Painting interior trim is one of the easiest ways to refresh a room, but achieving a smooth, long-lasting finish starts with proper preparation. One of the most common questions homeowners ask is whether sanding trim before painting is really necessary—or if it’s a step that can be skipped.
The answer depends on the type of existing finish, the condition of the trim, and the type of paint you’re using. In this guide, we’ll explain when sanding is essential, when a light scuff is enough, and how proper preparation helps create a durable, professional-looking finish.
Key Takeaways
- Sanding is essential when painting over oil-based trim or glossy surfaces.
- Previously painted latex trim often only requires light scuff sanding or de-glossing.
- Proper cleaning and surface preparation are just as important as sanding.
- Priming is recommended when switching between oil- and latex-based paints or when covering stains or bare wood.
- Taking the time to prepare your trim properly helps create a smoother, longer-lasting finish.
Do You Need to Sand Trim Before Painting?
Whether you need to sand trim before painting depends on the existing finish, the condition of the trim, and the type of paint you’re using. In many cases, sanding improves paint adhesion and creates a smoother finish. However, if the trim is already painted with latex, is in good condition, and has been properly cleaned, light scuff sanding or de-glossing may be all that’s needed before repainting.
When Should You Sand Interior Trim?
First, the must-do sanding scenario: oil trim, no matter what you intend to paint over the oil, it must be sanded first. Oil-based paint dries to a very hard finish, it’s the main reason for the legacy of durability oil paint enjoys; oil finishes are also renowned for wash-ability – thanks again to the hard finish.
The hardness of the finish is also the fly in the ointment when it comes to repainting over it. That hard finish needs to be roughed up a little bit before anything new will adhere properly to it – even primer!
Be wary of primers that advertise “no-sanding”, it’s an elixir – a promise of labor savings at the cost of nothing really, you were going to prime anyway, right? So why not get the one that sells itself as a labor saver.
Why Sanding Makes Paint Stick Better
The reasons are two: first, sanding creates a mechanical bond; a rough surface for the primer to stick to is better than a smooth glossy one. Imagine pouring a thimble of paint on your cars’ windshield, and another thimble on your driveway; which one is easier to remove?
By sanding, creating a mechanical bond, you’ve given the primer a roughened surface – a profile – to stick to. On top of the primer, anything will stick very well, without sanding it.
Do You Need to Sand Latex Trim?
Latex paint or acrylic trim is different than oil in many ways. The most important is sand-ability. These finishes don’t sand nearly as easy as oil, but it’s still important to prepare the surface.
De-gloss shiny acrylic trim paints with steel wool and then clean by vacuum, tack cloth, and then with a non-soapy cleanser such as Dirtex or TSP substitute.
When Can You Skip Sanding?
There are situations where extensive sanding isn’t necessary. If the existing paint is in good condition, the surface has been cleaned thoroughly, and you’re applying the same type of paint, a light scuff sanding or liquid de-glosser may provide enough surface preparation.
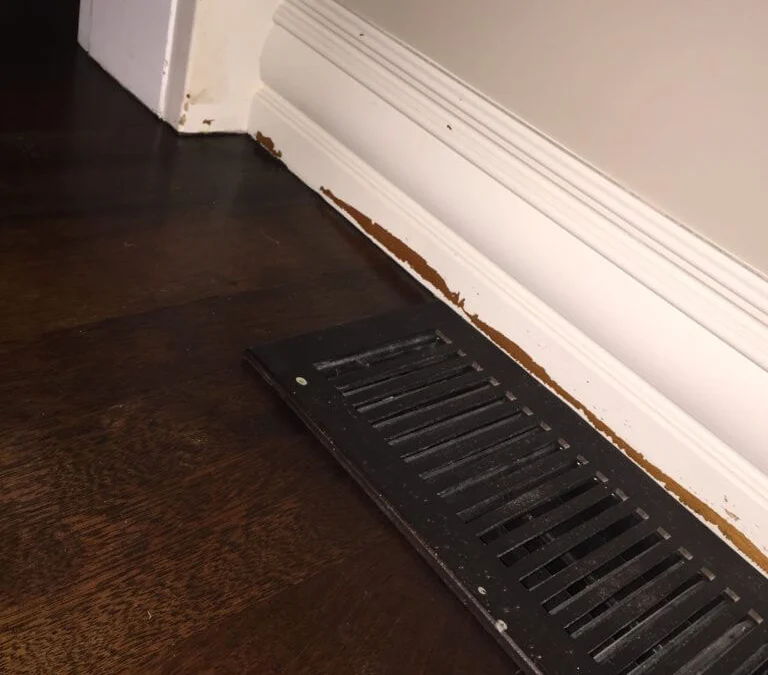
However, glossy finishes, peeling paint, damaged trim, or switching between oil- and latex-based paints generally require more thorough sanding and priming to ensure proper adhesion.
When Should You Prime?
Now, your trim (oil-based, or latex) is ready for the first coat. You can prime if need be; a good scenario for priming is if there’s a lot of staining or heavy prep, or bare wood.
If the existing paint film is largely intact, and now properly prepped, priming is optional.
Primers are designed to accomplish either or both: block stains, adhere to surface. So, if your surface is properly prepped, and in good shape, you’re free to skip primer entirely and paint, unless you’re changing material types.
If you’re going over prepped oil with latex trim, you should prime. If you’re going over prepped latex with oil trim, you should prime.
If you’re unsure, prime.
What Grit Sandpaper Should You Use?
For most interior trim painting projects, 120- to 150-grit sandpaper works well for light preparation. If you’re sanding primer or smoothing between coats, 220-grit sandpaper provides a finer finish without leaving noticeable scratches.
The goal isn’t to remove all of the existing paint. Instead, you’re creating enough surface profile for primer or paint to bond properly.
Should You Sand Between Coats?
Primers should be sanded the following day, then vacuumed and wiped down before the first topcoat is applied. The second topcoat can usually be applied directly over the first as long as you’re still within the manufacturer’s recommended recoat window. Always check the product instructions to ensure proper adhesion and curing.
Conclusion
Proper surface preparation is one of the biggest factors in achieving a durable, professional-looking trim finish. Knowing when to sand, when to prime, and when a light scuff is enough can save time while helping your paint perform the way it was designed to.
Whether you’re repainting previously painted trim or changing from oil- to latex-based paint, taking the time to prepare the surface properly will help you achieve smoother, longer-lasting results.
If you’d rather leave the preparation and painting to an experienced professional, Imhoff Painting specializes in detailed interior trim painting throughout the Denver metro area. From thorough surface preparation to the final coat, we use proven techniques that deliver smooth, durable finishes built to last. Contact us today to schedule a consultation.
FAQ
Can you paint trim without sanding?
Sometimes. If the trim has already been painted with latex, is in good condition, and has been thoroughly cleaned, a light scuff sanding or de-glosser may be enough before repainting. However, glossy finishes, damaged trim, or oil-based paint generally require sanding to ensure proper adhesion and a durable finish.
How do you prep previously painted trim?
Prepping previously painted trim is straightforward—clean, scuff, wipe, and prime (if necessary). A quick pass with a degreaser takes care of grime; then light sanding knocks down any gloss. A tack cloth or a vacuum ensures no dust lingers. If you’re switching from oil to latex, prime it—don’t skip this step unless you like peeling paint. You can go straight to the topcoat if the existing paint is solid.
What grit sandpaper should you use on trim?
For most trim preparation, 120- to 150-grit sandpaper works well. Between coats of primer or paint, 220-grit sandpaper is commonly used to create an even smoother finish.
Do I need to sand between trim coats?
Not always, but if you’re after a glass-smooth finish, then yes—a light scuffing is your best friend. A fine 220-grit pass levels out imperfections and gives the next coat something to hold onto. Wipe it down, and you’re ready for the next layer. If you’re within the recoat window and the first coat is flawless, skip it and carry on.
Can I paint over already painted trim?
Yes, but proper prep is the difference between a job that lasts and one that peels in six months. Clean the surface, dull the sheen with light sanding or de-glossing, and if you’re crossing the oil-to-latex bridge—prime it. If the existing paint is in great shape and you stay in the same paint family, go straight to your first topcoat.